A projector for art tracing projects an image onto a surface for easy outlining and accuracy. Artists often use this tool to transfer designs for various creative projects.
Projectors for art tracing streamline the creative process, allowing artists to focus on technique and execution. They come in different types, from simple opaque projectors to advanced digital models, catering to diverse artistic needs. These devices enable precise images, patterns, or text duplication onto canvases, papers, and walls. These projectors are similar looking to Ultra-short Throw projectors but different in their working wavelength.
Whether for professional art installations or hobbyist craft projects, a tracing projector is a valuable tool in an artist’s arsenal. It enhances productivity and precision, reducing the time spent sketching complex designs. By selecting the appropriate projector, artists can ensure their work maintains fidelity to the original concept, thus improving the overall quality of their artistry.

Credit: m.youtube.com
Types of Projectors for Art Tracing
Choosing the right projector for art tracing can make all the difference in your creative process. Various types of projectors offer unique features and benefits. Let’s explore the most popular types designed for artists.
Opaque Projectors
Opaque projectors work by shining a bright light onto an opaque object. They then project the image onto a surface for tracing. Ideal for artists, these projectors handle items like books, photographs, or small 3D objects with ease.
- Simple to use: Just place the object on the projector’s glass surface.
- Versatile: Enlarge images onto any vertical surface.
- No need for transparency: Works with opaque materials directly.
Digital Projectors
Digital projectors are the modern choice for artists. They connect to computers or USB drives, displaying digital images with precision.
| Feature | Benefit |
|---|---|
| High Resolution | Clear, detailed images for intricate tracing work. |
| Adjustable Settings | Customize size and focus to suit your project. |
| Portability | Easy to move and set up anywhere. |
Both opaque and digital projectors offer unique advantages. Consider your art style and needs before making a choice.
Choosing The Right Projector for Art Tracing
Artists and creatives often seek new tools to bring their visions to life. A projector for art tracing can be a game-changer. It allows artists to project images onto a canvas, wall, or any surface. The right projector can simplify the process of scaling artwork and perfecting details. With several options available, selecting the right projector needs careful consideration. Focus on resolution, brightness, portability, and size.
Resolution And Brightness
High resolution means sharper images. For artists, this is crucial for detailed work. Look for projectors with a minimum of 720p. Brightness, measured in lumens, is also important. A brighter projector can handle well-lit rooms. A good range to consider is between 1000 to 3000 lumens.
Portability And Size
Portability matters for artists who work in different places. Compact projectors are easy to move. They should be lightweight and have a small footprint. Some models come with a carrying case. Others can be easily tucked into a bag. Consider your workspace and mobility needs before making a choice.
Best Art Projector Tracer For 2024
The Artograph Flare 450 Digital Art Projector stands out for 2024. This projector offers:
- 1080p resolution for crisp, clear images.
- 450 lumens of brightness, suitable for various lighting conditions.
- A compact design, making it highly portable.
It’s a top pick for artists seeking quality and convenience.
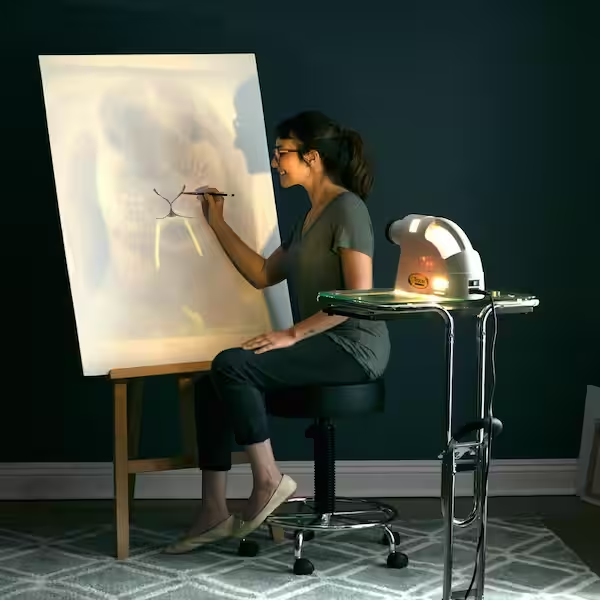
Setting Up The Projector
Artists and crafters understand the importance of precision and detail. Tracing artwork with a projector can transform your creative process. The right setup is crucial for perfect results. Let’s dive into how to efficiently set up your projector for art tracing.
Calibrating The Projector
Calibration is the first step in preparing your projector. Ensure your projector is firmly positioned and aligned with your tracing surface. The image needs to be sharp. Follow these steps:
- Turn on the projector and let it warm up.
- Place a calibration image or grid on the screen.
- Adjust the projector’s focus until the lines are clear.
- Check the projector’s settings to fine-tune brightness and contrast.
Adjusting The Image
With your projector calibrated, you must adjust the image. This ensures your artwork matches the desired size and position. Follow these tips:
- Zoom in or out to match the tracing area.
- Move the projector closer or further to adjust the image size.
- Use the projector’s keystone feature to correct any distortion.
- Secure the projector to avoid any movement.
Remember, the right setup leads to flawless tracing. Take your time with these steps for the best outcome.

Credit: www.homedepot.com
Techniques For Art Tracing
Exploring Techniques for Art Tracing can transform how artists recreate and design works. Tracing is not just about copying; it’s a skillful method to learn and enhance drawing capabilities. Let’s dive into two effective techniques: the Grid Method and Projection Mapping.
Grid Method
The Grid Method involves drawing a grid over your reference image and a corresponding grid on your drawing paper. This technique helps maintain correct proportions without directly tracing the original image.
- Step 1: Place a grid on the reference photo.
- Step 2: Draw a similar grid on your drawing paper.
- Step 3: Copy each square individually to recreate the image.
This method is perfect for beginners. It teaches you about scaling and positioning.
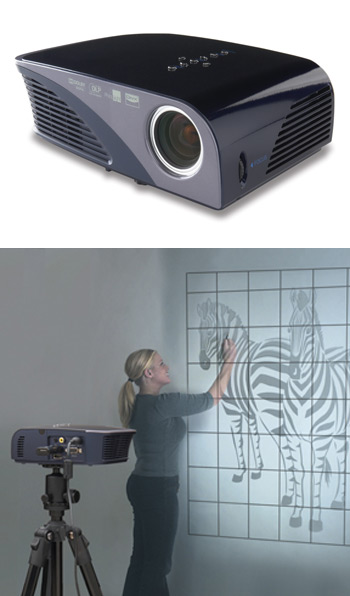
Projection-Mapping
Projection Mapping uses technology to project an image onto a surface, allowing artists to trace outlines accurately.
- Step 1: Set up your projector with the chosen image.
- Step 2: Adjust the projector to fit the image onto your drawing surface.
- Step 3: Trace the projected image with a pencil or marker.
This method is great for complex designs and saves time. It ensures detailed and precise reproductions.
Tips For Successful Art Tracing
Artists and hobbyists alike know the value of tracing in creating perfect outlines and shapes. Tracing with a projector can be even more effective. Here are tips to make art tracing a breeze.
Optimizing Lighting Conditions
Good lighting is key for clear, sharp images. Start with a dark room. Use a focused light source. Adjust the projector’s brightness to match.
- Close curtains or blinds to prevent outside light.
- Position the projector to avoid glares.
- Use a dimmer for adjustable room lighting.
Using Tracing Paper
Tracing paper can make transferring designs easy. It’s thin, translucent, and comes in rolls or sheets. Here’s how to use it effectively:
- Choose the right thickness for your project. Thinner paper is easier to trace through.
- Secure the paper so it doesn’t shift. Use tape or weights.
- Trace with the right tools. Pencils or fine-tipped pens work best.
Projector Maintenance
Keeping your art tracing projector in top shape is essential for clear, precise projections. Regular maintenance ensures longevity and optimal performance. Let’s dive into some key maintenance tips.
Cleaning The Lens
A clean lens is vital for a sharp image. Follow these steps to maintain clarity:
- Turn off the projector and unplug it.
- Wait for the projector to cool down completely.
- Use a soft, lint-free cloth to gently wipe the lens.
- For smudges, apply a small amount of lens cleaner to the cloth.
- Avoid touching the lens with your fingers.
Storage Tips
Proper storage protects your projector from damage. Remember these points:
- Store in a cool, dry place away from direct sunlight.
- Use the original packaging or a padded case for extra protection.
- Keep away from dust and moisture.
- Remove batteries if not in use for an extended period.
Credit: www.jacksonsart.com
Frequently Asked Questions
Can You Use A Projector To Trace Art?
Yes, you can use a projector to trace art by projecting an image onto a surface and outlining it. This method aids in achieving accurate proportions and details.
What Kind Of Projector Do Artists Use?
Artists often use digital projectors or art projectors for tracing, detailing, and scaling their artwork. These devices provide clear image projection, aiding in precise reproductions and murals.
How Can I Use My Phone As A Projector For Tracing?
To use your phone as a projector for tracing, download a tracing app or use a camera app to display the image. Position your phone over the paper, adjusting the brightness and focus as needed. Secure the phone using a stand or makeshift holder for stability.
How To Make A Homemade Projector For Tracing?
To make a homemade projector for tracing, gather a shoebox, magnifying glass, tape, and smartphone. Cut a hole in the box’s end, fit the glass into the hole, and secure it with tape. Place your smartphone inside, display the image, and project it onto a blank surface for tracing.
Conclusion
Embracing the right projector can transform your art tracing journey. It’s about precision, ease, and efficiency. Whether a hobbyist or professional, the ideal device awaits. Explore options, consider features, and pick wisely. Your next masterpiece deserves the perfect tracing companion.
Let creativity flourish with the best projector for your art.